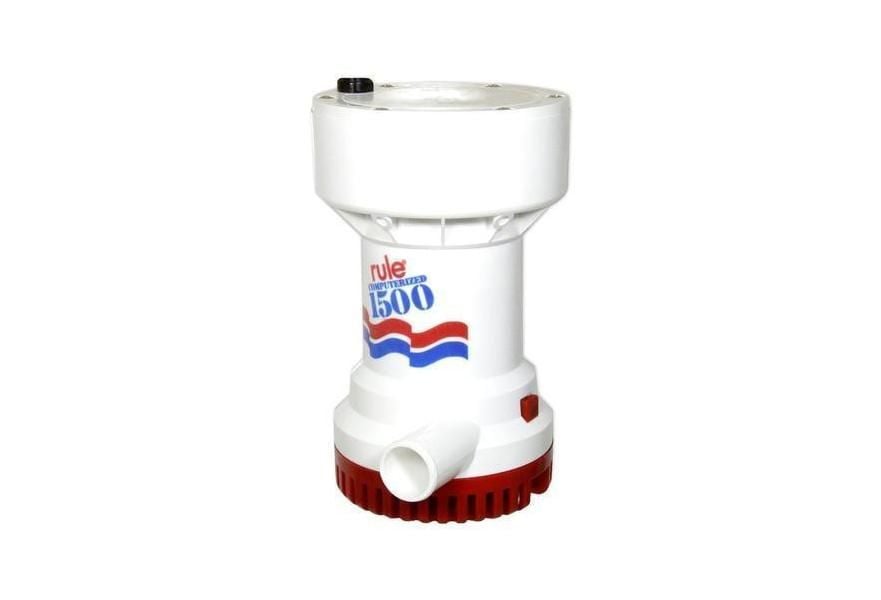


BILGE PUMP RULE MATE 2000 GPH – RM2000A-12V,24V-AUTO
Price range: 1.660,00 د.إ through 1.720,00 د.إ
RM2000A-12V: Bilge Pump 2000GPH 12V
• Automated bilge pump
• All-in-one pump and float switch
• No float switch required
• Outlet Dia: 1-1/8″
RM2000A-24V: Bilge Pump 2000GPH 24V
• Automated bilge pump
• All-in-one pump and float switch
Description
BILGE PUMP RULE MATE 2000 GPH – RM2000A-12-AUTO
RM2000A-12V: Bilge Pump 2000GPH 12V
• Automated bilge pump
• All-in-one pump and float switch
• No float switch required
• Outlet Dia: 1-1/8″
RM2000A-24V: Bilge Pump 2000GPH 24V
• Automated bilge pump
• All-in-one pump and float switch
How to Install onboard Bilge Pump Rule Mate 2000 GHP
Installing a Rule 12V bilge pump on a boat involves electrical and plumbing work to ensure proper functionality and safety. Here’s a step-by-step guide:
Tools & Materials Needed:
-
Rule 2000 12V bilge pump
-
Marine-grade wire (usually 14- or 16-gauge tinned copper)
-
Inline fuse (15- to 20-amp recommended)
-
Waterproof butt connectors or heat shrink terminals
-
Marine switch (manual or automatic float switch)
-
Hose (1-1/8″ or 1-1/4″, depending on model)
-
Hose clamps
-
Drill and screws
-
Silicone sealant or marine adhesive
-
Zip ties or wire clamps
-
Wire stripper/crimper
Step-by-Step Installation:
1. Choose Location
-
Mount the bilge pump at the lowest point of the bilge where water collects.
-
Ensure it’s in a spot free from debris and with enough clearance for maintenance.
2. Mount the Pump
-
Clean and dry the mounting surface.
-
Attach the pump using stainless steel screws.
-
If using a base plate or strainer, secure it first and then snap the pump into place.
3. Connect Discharge Hose
-
Attach the correct size hose to the pump outlet.
-
Route the hose to a thru-hull fitting well above the waterline.
-
Secure hose with stainless steel hose clamps.
-
Avoid sags or loops in the hose to prevent water from sitting and backing up.
4. Electrical Wiring
-
Use marine-grade tinned copper wire.
-
Connect the black (negative) wire from the pump to the boat’s negative bus bar or battery ground.
-
Connect the brown (positive) wire to a float switch or manual switch:
-
Automatic setup: Wire the pump through a float switch to the battery with a fuse on the positive lead.
-
Manual setup: Wire the pump to a bilge pump switch on the dash, with a fuse and optionally a lighted switch.
-
5. Add a Fuse
-
Place a 15-20 amp inline fuse as close to the power source (battery or panel) as possible to protect the circuit.
6. Seal and Secure Wiring
-
Use waterproof connectors or heat-shrink tubing.
-
Route wires neatly and secure with clamps or zip ties.
-
Avoid sharp edges and moving parts.
7. Test the Pump
-
Pour water into the bilge to test the float switch if automatic.
-
Manually switch on the pump to verify operation.
-
Check for leaks at hose connections and ensure water is discharging properly.
Why Choose Us?
-
Extensive Selection: From stainless steel fittings to modern electronics, we stock a wide range of parts for every kind of boat and budget.
-
Marine-Grade Quality: Our products are built to withstand the harshest marine environments, ensuring performance and longevity.
-
Expert Advice: Our team includes experienced boaters and marine technicians ready to help you make the right choice for your vessel.
-
Fast & Reliable Shipping: Get the parts you need, when you need them—thanks to our streamlined logistics and dependable delivery partners.
-
Customer Satisfaction: We pride ourselves on exceptional customer service, backed by hundreds of positive reviews and returning clients.
-
Competitive Prices: Get the best value without compromising on quality
Additional information
| Voltage | 12V, 24V |
|---|

Reviews
There are no reviews yet.